

Tart Deco™ is a blog that journals vintage and retro culture from 1920-50, including info on fashion, music, sewing techniques and vintage weddings.
Showing posts with label vintage repurposing. Show all posts
Showing posts with label vintage repurposing. Show all posts
Thursday, January 12, 2012
Vintage Style Pom Pom Hat Tutorial

Wednesday, March 2, 2011
Rockabilly DIY from Design Sponge
 |

Vintage brooch knobs (shown above)
Kitchen glass canister makeover
Kitchen metal canister makeover
Vintage Hankie boudoir pillow (shown left)

Light switch cover
Fabric covered hangers
Decorative shelf edging
Bookstrap side table (shown right)
Saturday, December 18, 2010
Blog Spotlight- Sew Weekly

I just adore this blog! Sew Weekly is a project blog by the talented and very creative Mena Trott to create a wardrobe sewn by her. Her taste is very vintage inspired and she usually uses vintage patterns and recycles/upcycles vintage items from thrift stores. I also like how she gives you very specific information about each piece and what inspired her to make it.

I have a pink scalloped tablecloth I bought to make a dress and I am so inspired by Mena's post that I may have to move it to the top of my "to sew" list.

Saturday, August 21, 2010
Tart Up Your Sewing Room
Hold on to your hats! I have gotten addicted to making teacup pincushions. I made one for an apron swap I am in right now and it was so fun I made more. A LOT more. So I am going to start selling them in my online Tart Deco store on etsy.

 Sherbert Tart
A candy-colored cushion with handmade ribbon flower and glass raspberry affixed on top. Comes with decorative paper flowers, not attached. There is a lovely ornamental pedestal bottom on the teacup.

All the pincushions come with matching saucers that are not attached, but can be at your request. To lay claim to one of the above lovelies visit my Tart Deco etsy shop or click on the title of each pincusion for a direct link.

This teacup is especially wonderful because it has 3 claw feet. I made the cushion smaller to see the flower detail inside the rim of the cup. The pink flower is included, but not attached.

A candy-colored cushion with handmade ribbon flower and glass raspberry affixed on top. Comes with decorative paper flowers, not attached. There is a lovely ornamental pedestal bottom on the teacup.

This is my favorite so far and the most unusual. A half-moon pin cushion of red velvet and vintage lace allows a flower detail to peek out from the inside of this bone china teacup. The cup also has a pedestal bottom that fits gently into the matching saucer.
All the pincushions come with matching saucers that are not attached, but can be at your request. To lay claim to one of the above lovelies visit my Tart Deco etsy shop or click on the title of each pincusion for a direct link.
Thursday, July 15, 2010
Mend & Make Do

Va-Voom Vintage turned me onto this great sewing project on the New Vintage Lady blog called Make & Mend Month. I l-o-v-e finding vintage Mend & Make Do pamphlets and I have used some of the tips to repurpose items that I have to give them a new life. This challenge comes at a perfect time because I have a 1930s apron that is very fragile that I plan to reinforce and attach to another pinafore apron for the Alice in Wonderland apron swap I am in.
There is half of July left so you can still join in the Make Do fun! Below are the suggestions from New Vintage Lady on how to participate. Make sure to stop by and post to let her know you are joining the fun!

Just for fun, here is a scan from one of the Make Do & Mend pamphlets in my personal collection.

Tuesday, April 13, 2010
How to Refill a Vintage Lipstick Holder

My very crafty blog friend Brittany at Va-Voom Vintage Blog has posted a step-by-step how-to for refilling a vintage lipstick holder with modern lipstick. Brilliant!
Wednesday, April 7, 2010
What's On Sale- Pretty in Pink


The fashion in this movie is what I remember most from growing up. Yes, there was the neon pink and green, legwarmers and weird leotard thingies, but this uber-soft, feminine vintage look has stayed with me til this very day.
So for fun, I put together a "Pretty in Pink" outfit from items available on etsy right now. Starting from the top down:

Vintage Black WOOL and Bouquet Hat from thepuddingstorevint

the librarian series/ cream spring blouse from thefeatheredwomb

Vintage large oval floral rose cameo brooch from sakatagin

vintage EMBROIDERED pink cardigan. M/L from SimpleThrift

Vintage 80s Leather belt Rocker chic Medium from ChordsofMemory

black velvety floral design long skirt from MissBs

Womens size 8.5 Danexx vintage black ankle boots from KidCurry
So there you go. Everything you need to be Pretty in Pink. If you haven't seen the movie, rent it asap. Or better yet, buy the new Everything's Ducky special edition dvd.
Tuesday, February 16, 2010
Vintage Furs- the Dilemma

To make it a little easier, from now until April 22, you can drop off your donation at any Buffalo Exchange, a nationwide resale store. Just make sure to let them know it's for Coats for Cubs.
Wednesday, November 18, 2009
Upcycling and Recycling Vintage

Some people are adamantly opposed to modifying vintage items, even if they are damaged, because they feel the item has historical significance and should not be altered in any way. Then there are the people who believe that they are creating new art and view the vintage piece as a medium.
I am somewhere in the middle. While I agree that tearing into a vintage item purely to make a profit is not cool, I do believe that things are to be used and it does no one any good if they are locked up in a box collecting dust. If there is a perfectly good vintage item, like a dress, that can be worn, then it should be worn. If it has sentimental value to it, then find a way to display it or have a seamstress recreate the pattern (this can be done without taking it apart) and have a reproduction made. There are infinite possibilities available to utilize a vintage piece.
When it comes to a damaged item, I revel in the fact that it has been loved in its original form and I try to find a way to recycle or upcycle as much of the item as I can. This does not mean ripping it apart and using it for kindling! It could mean adding a few panels to the skirt where the seams have ripped, or making the dress sleeveless because the underarms have disintegrated. Both of these examples I took directly from a Make Do & Mend book I have from 1953. Yes, make-do continued long after World War II because women still wanted or needed to be thrifty and altering old garments was a great way to do it.
So I ask- how is recycling or upcycling any different than make-do and mend? In 50 years, how are we to know that someone won't look at my modifications of damaged goods as a vintage masterpiece? Of course, there are always exceptions, but on a whole I don't see anything wrong with saving a damaged vintage item so it can actually be used.
Thoughts or opinions? I'd love to hear them!
Wednesday, October 7, 2009
Vintage Dream
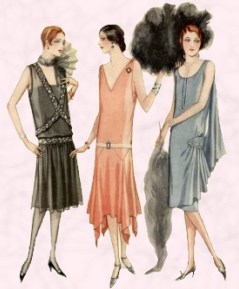
Am I glad I did! I was able to find a few bags full of vintage clothing and linens that I may be able to save or repurpose, including 50s shirt dresses. Unfortunately they are all tiny, tiny sizes- so no luck with that part of my dream. Once I launder them and get them in wearable condition I will put them in my store and post about it here.
One item I will most likely not sell is an Art Deco drop-waist flapper dress made in peach chiffon crepe with a handkerchirf skirt trimmed in lace (similar to the middle dress in the picture). It has flutter sleeves which unfortunately are ripping in the armpits (one of the reasons I will probably keep it) and a side seam that is closed with snaps and hooks. There is no label, nor is there any indication there was one, so I believe this is a homemade dress, especially because much of it is hand-sewn. My goal is to restore it and frame to put in my sewing room. I am in the process of taking pictures and will post them as soon as I can.
Step one in restoration is washing it. The material is fragile, but it has a distinct odor and needs to be laundered. I actually think it would be worse to not wash it as whatever is on it is stiffening and breaking down the fibers of the material. I am still researching different laundering options, but my instinct is to handwash in room temperature water using a small amount of woolite (or silk detergent if I can get my hands on it). I don't trust a dry cleaner to be able to handle this dress, unless I took it to a specialist which I think may be a little overkill in this case. The dress is amazing, but not unique enough to warrant an excessive amount of money, plus my instincts tell me it isn't necessary.
If I try to handwash, I will use towels underneath the dress to lift it out of the water when washing and rinsing so I don't put excess strain on the material. I will also add a small amount of vinegar to the rinse water to neutralize any leftover soap. Then I will sandwich between two towels to roll out excess water and let dry flat on yet another towel. Once the dress is dry I plan to let it hang on a padded hanger to let it aerate and see what shape it is in. Hopefully this will be enough to soften up the fibers again and get the smell out. If not I will attempt a second washing with a little more detergent and a longer soak time. If this still doesn't work, I may stop here as I don't think the dress will survive an Oxyclean bath. I will try to post after each step to let you know if my instincts are correct :) Wish me luck!
Thursday, May 14, 2009
Alteration of Patterns
Have you heard of the website Chestofbooks.com? If not, you are in for a real treat! this site is PACKED FULL of books in the public domain on various subjects. Of course, my favorites are the ones on sewing and domestics. I have found many historical tips and tricks to fix vintage clothing or use similar techniques when I am sewing to make my reproduction clothing just that much more fun.
 Today I link you to a book with a chapter on how to alter patterns. As you can see by the picture, it is similar to another link I posted about resizing vintage patterns, but I actually found this tutorial easier to follow. Perhaps because it is written for beginning sewers.
Hey brides who sew- search using the words "alteration, "alter"or "modify" (or just browse the sewing books)and see what tidbits you come up with on how to use vintage techniques to alter a dress you bought.
Today I link you to a book with a chapter on how to alter patterns. As you can see by the picture, it is similar to another link I posted about resizing vintage patterns, but I actually found this tutorial easier to follow. Perhaps because it is written for beginning sewers.Hey brides who sew- search using the words "alteration, "alter"or "modify" (or just browse the sewing books)and see what tidbits you come up with on how to use vintage techniques to alter a dress you bought.
Friday, April 24, 2009
Save the Date Hankies & Giveaway (giveaway closed)

 Wow. When I came across these Save the Date handkerchiefs on Alisha Clark's blog (through the Pink Book Blog that I post on) I was floored. I was also extremely jealous- why didn't I think of that?!? The pictures speak for themselves at how cool an idea this is. How do you get your hands on some of these for yourself? The talented Erin at Lucky Luxe did them and she also does business card hankies.
I have been obsessed lately with vintage handkerchiefs and have been slowly amassing a large collection of them. The personal history behind them makes me feel like I am connecting to some amazing women who often handmade and/or trimmed them. I always have one stuffed inside my sweater cuff in the winter and neatly tucked under my belt when I wear vintage dresses.
In fact, I have so many vintage hankies now that I will be adding them to my Tart Deco shop very soon. Nothing says Vintage Glamour & Retro Style than a pink linen hankie with hand-crocheted edges.
The Giveaway:
To celebrate my soon-to-be new shop section of hankies and the amazing Save the Date idea above, I will be giving a pair of vintage hankies of my choice to one of my lucky readers! They won't be printed like the ones above, but I bet you could use them for it :)
To enter you must post 2 things in one comment:
1. Tell me a creative way to use a handkerchief. This could be a cool way to fold it, paired with something, sewn onto something, etc.
2. Visit my etsy shop, Tart Deco, and tell me what your favorite item is or other vintage or retro items/sections you would like to see me add.
--Make sure that your email is available through your blog profile or put it in the comment so I have a way to contact you.
For an extra entry become a follower of this blog (or let me know you already are) and leave an extra comment for your extra chance to win.
The giveaway ends May 1st at 10 pm central time and I will post the winner (chosen by using random.org) on May 2nd.
Good Luck!
NOTE: I do NOT do the printing on the hankies, I just have the hankies themselves. If you want the printing done contact Erin at Lucky Luxe.
Thursday, April 9, 2009
Something Old- Wedding Corset

Like many of you, I was given my mother's wedding dress to use as I saw fit for my wedding. I knew I wouldn't be able to use it as is because I wouldn't be able to fit into it to save my life (this is my 14 yr-old, size 6, niece modeling it) and it wasn't the style that would fit with my rockabilly theme. I decided to have it made into my wedding corset.
I mentioned in a previous post that I found a delightful seamstress to make my corset for me, so the next step was to prepare the material and see if it could be repurposed. The dress was a satin acetate with a netting overlay that also had pieces of beaded lace stitched onto it. There was a matching train that attached at the shoulders. I planned on using the acetate as the outer layer of the corset with pieces of the beaded lace as an accent.
Despite not being stored properly, the acetate was in pretty good condition and hadn't yellowed at all. The overlay and lace had yellowed, but were still in good shape (no holes, beading complete). There was a slight odor that I knew would come out with washing it. Yes, I said washing it. My mother had looked into having the dress drycleaned and it would have costed anywhere from $150-300! This would have been acceptable if I was planning on wearing the dress as is, but for material pieces- no. I did some research on cleaning methods of vintage clothing and decided to chance washing the material myself, keeping in mind that water does break down the fibers of acetate. I thought it best not to wash the dress sewn together, especially because I was only going to use the train for the acetate and 2 pieces of the beaded lace, so I took the dress apart and only washed the pieces I needed. This way, if the washing did ruin the material, I still had more to try using another method. I ended up soaking the material in oxyclean overnight and airdrying the pieces on plastic hangers.

As you can see by the pictures of my corset, the material cleaned up nicely! Emily of Rohm on etsy did a marvelous job of constructing the corset from my ideas and added the lace on the front panels.
Isn't that sweetheart shape to the top of the corset to die for?
The curves are gorgeous and it gives a marvelous base for my aunt and me to shape my wedding dress bodice on. It hardly feels like I have it on at all!
(crossposted to The Pink Bride)
(crossposted to The Pink Bride)
Tuesday, January 27, 2009
The Dress

I have always been in love with Audrey Hepburn's wedding dress in Funny Face. I knew I couldn't afford a modern reproduction of it and the chances of me finding a vintage dress in my size is nil- I am a curvy girl that hasn't been a size 6 since middle school.
I am lucky enough to be a seamstress so I decided to make my dress. I am also lucky enough to have an aunt who went to fashion school and owned her own bridal shop in LA before she moved back to WI and I quickly drafted her help.
 The first thing I did was to get online and find pictures of dresses and patterns from the 50s that I liked for inspiration, besides Audrey's dress that is. My original idea was to buy the material and resize a vintage pattern to make the dress from scratch. As I was searching, I found a vintage prom dress on e-bay that I fell in L-O-V-E with (on the right). It wasn't even close to my size, but the skirt could have been detached from the bodice and either reattached to a new one in my size or kept as a skirt and I would make a shirt to go with it. I could then reattach after the wedding so the dress could live on it it's original form.
Alas and alack, I lost the bid by $10. After much gnashing of teeth, I realized that although I didn't win my dream dress, I could possibly use other vintage dresses to refashion my dress and save a ton of money on materials, as well as be green. I found three gorgeous dresses (all beautifully beaded) at a thrift store in Wheeling, IL (my fiancee's hometown) called Little Mexico. For less than $100 I got the dresses, as well as some other wedding items like a veil and ring pillow. SCORE!!!
The first step was to meet with my aunt, show her the dresses I found and sketch out the idea for the dress. I knew I wanted the full skirt and really liked the look of a drop waist. I wasn't too picky about the sleeves or neckline, but I knew that a sweetheart neckline is flattering for my figure. I did find a pattern ($1.50) that was close to what I wanted that we will be using as inspiration for the dress, the only change being a sweetheart neckline-

We decided to have me try the thrift store dresses on to see if there was anything about them that we could keep or if we would have to take them completely apart. None of them were my size, but I was able to slip them over my head and leave them unzipped to get a basic idea. This was the smartest thing we could do as once I had them "on" my original opinions on each dress changed and we ended up picking one dress with a scoop neckline to use for the bodice and another to use for the skirt. By doing this we would be able to use parts of the skirt from the"bodice dress" to add in side panels to make the bodice fit me. We also decided to have the front pieces of the bodice extend down into the skirt because the beading was so beautiful and went down the entire front. We may change this as we get farther into construction because it may be too awkward to have the one straight piece in the front of the skirt with the rest of the skirt gathered into a drop waist seamline. More on that later...
 The full beading also meant we would be keeping the sleeveless cut of the gown and creating a faux sweetheart neckline by pinching the front of the scoop neckline with a gather. Because the dress will be sleeveless I decided to also make a bolero jacket in a 50s style. Back on e-bay I found a pattern I liked which cost $7 with shipping. It will have to be resized, but I love the high neck. I will be using leftover material from the thrift store dresses to make it, probably part of the skirt of the "bodice dress."
Sorry I have no pictures of the thrift store dresses to give you a better idea of what I mean as I explain everything, but I am trying to keep any visuals of the materials a secret from my fiancee. I will be posting a ton of of pics after the wedding, I promise.
The construction of the dress will start once I have my wedding corset in hand. Once again I am repurposing and using my mother's wedding dress for the outer layer of the corset. I didn't want the stress of making it myself, especially because I have never made a corset with a busk front, so I am having a custom corset made by the super talented Rohm on etsy. I was pleasantly surprised to find that she lives within driving distance of me and went to college with a close friend of mine who highly recommended her work. I could tell from meeting with her that she had skillz and I can't wait to get my corset from her!
 Another integral part of my dress is the crinoline. I decided to go with a traditional white dress, but my netherpinnings will be lipstick red. I ordered a 22"long soft chiffon crinoline with matching pettipants from Glamour Boutique online. Both items together cost $61 (free shipping). The only drawback of ordering from this site is that it takes 14-18 weeks to get the crinolines from the manufacturer due to the custom sizing available. Order with PLENTY of time. Luckily I have other crinolines to use for hemming my dress until the real one comes.
My next post will be on my dress accessories, including my custom veil...
Subscribe to:
Posts (Atom)
Link Within
